Use React Admin with Hasura and Nextjs
Roger Stringer / June 20, 2021
5 min read
I use Hasura for a lot of dynamic database related work on this site and others. Recently, I wanted a nice admin panel that I could use for editing some content I have on there and saving to Hasura.
Since I wanted to use a rich text editor for this particular part, I decided to go with React admin and also to use Hasura's adapter for connecting the two.
I'm going to assume you've created a nextjs site already, so let's dig into adding the admin panel:
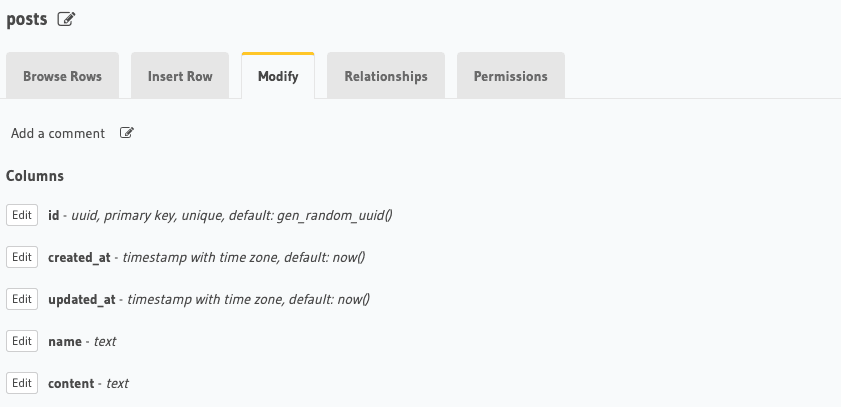
For this example, we'll use a basic table called posts:

This is just a basic table, but works to show how to use React Admin with Hasura.
yarn add react-admin ra-data-hasura ra-input-rich-text @apollo/client
One thing to note, I highly reccomend looking at putting this behind a password, I'm only showing how to implement react admin, but you should make sure this is protected somehow.
Getting Started
First, create a file called pages/admin/index.js:
import dynamic from "next/dynamic"

const ReactAdmin = dynamic(() => import("../../components/admin/ReactAdmin"), {
  ssr: false,
})

function AdminPage() {
  return (
    <ReactAdmin />
  )
}

export default AdminPage
This file is basic, and one thing it does is use Next Dynamic imports to handle creating the ReactAdmin element, which will be stored in our components folder under a folder called admin.
Ok, go to components and create a folder called admin, then create a file called ReactAdmin.js.
import * as React from "react";
import { Admin, Resource, ListGuesser } from 'react-admin';
import buildHasuraProvider from 'ra-data-hasura';
import { ApolloClient, InMemoryCache } from '@apollo/client';

const ReactAdmin = (props) => {
  const [dataProvider, setDataProvider] = React.useState(null);

  React.useEffect( () => {
    const buildDataProvider = async () => {
      const dataProvider = await buildHasuraProvider({
        client: new ApolloClient({
          uri: HASURA_GRAPHQL_ENDPOINT,
          cache: new InMemoryCache(),
          headers: {
              'x-hasura-admin-secret': HASURA_ADMIN_SECRET,
          },
        })
      })
      setDataProvider(() => dataProvider);
    };
    buildDataProvider();
  }, []);

  if (!dataProvider) return <p>Loading...</p>;

  return (
    <Admin dataProvider={dataProvider} title="My Admin">
      <Resource name="posts" list={ListGuesser} />
    </Admin>
  )
}

export default ReactAdmin;
In this example, I've created a resource called views, and assigned it to ListGuesser, this will output a table containing the data in the fields table in hasura, nothing special happening.
Now, if we want to create a custom view where one could edit or create content, then we want to change how we display data. ListGuesser is fine to show data straight from the db but it needs a little more.
Expanding our example
Let's expand on our posts resource so we can create, and edit records.
We'll add a new file to our components/admin folder called Posts.js:
import React from 'react';

import {
    Filter,
    List,
    Edit,
    Create,
    Datagrid,
    TextField,
    DateField,
    DateInput,
    RichTextField,
    SimpleForm,
    TextInput,
    TopToolbar,
    ListButton,
    EditButton,
    ShowButton
} from 'react-admin';

import RichTextInput from 'ra-input-rich-text';


const PostsFilter = (props) => (
    <Filter {...props}>
        <TextInput label="Search by Title" source="title" alwaysOn />
        <TextInput label="Content" source="content" allowEmpty />
        <DateInput label="Created" source="created_at" allowEmpty />
    </Filter>
);

export const PostsList = (props) => {
    return (
        <List filters={<PostsFilter />} bulkActionButtons={false} {...props} sort={{ field: 'id', order: 'DESC' }} >
            <Datagrid rowClick="edit">
                <TextField source="id" label="Post ID" />
                <TextField source="name" label="Name" />
                <RichTextField source="content" stripTags={false} label="Content" />
                <DateField source="created_at" label="Created" />
                <EditButton />
            </Datagrid>
        </List>
    )
}

const PostsTitle = ({ record }) => {
    return <span>{record ? `${record.name}` : ''}</span>;
};

const PostsEditActions = ({ basePath, data }) => (
    <TopToolbar>
        <ListButton basePath={basePath} record={data} label="Back" />
    </TopToolbar>
);

export const PostsEdit = (props) => (
    <Edit title={<PostsTitle />} actions={<PostsEditActions />} {...props}>
        <SimpleForm>
            <TextInput disabled source="id" label="Post ID" fullWidth />
            <TextInput source="name" fullWidth />
            <RichTextInput source="content" multiline label="Content" fullWidth/>
            <DateInput source="created_at" fullWidth />
        </SimpleForm>
    </Edit>
);

export const PostsCreate = (props) => (
    <Create {...props}>
        <SimpleForm>
            <TextInput source="name" fullWidth />
            <TextInput source="slug" fullWidth />
            <DateInput source="created_at" fullWidth />
        </SimpleForm>
    </Create>
);
As part of this, we now need to update our ReactAdmin.js file as well:
import * as React from "react";
import { Admin, Resource, ListGuesser } from 'react-admin';
import buildHasuraProvider from 'ra-data-hasura';
import { ApolloClient, InMemoryCache } from '@apollo/client';

import { PostsList, PostsEdit, PostsCreate } from './Posts';

const ReactAdmin = (props) => {
  const [dataProvider, setDataProvider] = React.useState(null);

  React.useEffect( () => {
    const buildDataProvider = async () => {
      const dataProvider = await buildHasuraProvider({
        client: new ApolloClient({
          uri: HASURA_GRAPHQL_ENDPOINT,
          cache: new InMemoryCache(),
          headers: {
              'x-hasura-admin-secret': HASURA_ADMIN_SECRET,
          },
        })
      })
      setDataProvider(() => dataProvider);
    };
    buildDataProvider();
  }, []);

  if (!dataProvider) return <p>Loading...</p>;

  return (
    <Admin dataProvider={dataProvider} title="My Admin">
      <Resource name="posts" list={PostsList} edit={PostsEdit} create={PostsCreate} />
    </Admin>
  )
}

export default ReactAdmin;
Ok, this gives a basic example of how to get React Admin, Hasura and Nextjs working together.
In another post down the road, I'll show how to combine what we've got now with reference fields to link tables together by relationships, such as topics or users or comments.
You can probably see there are several neat ideas that can come from this, such as keeping the admin local on its own site, creating content and then setting up a separate site that reads Hasura and creates a handy JAMstack blog, for example.
But first, I wanted to get readers into the idea of using this.
One caveat in using React Admin is that it wants your tables to include a field called id, it doesn't have to be the primary field but it looks for it, you could get around it by writing custom queries, but that's a little outside the scope of this post.
Finally, you'll need to create some env vars:
HASURA_GRAPHQL_ENDPOINTHASURA_ADMIN_SECRET
Remember you do want to put this behind a password, and in another post I'll show how to use React Admin's authProvider with Hasura to handle auth.